
Let’s take a look at one of the biggest pain points of the year in part one of a two part article.
This article is long already, and I’m breaking it in two different parts. Today, I’m focusing on power plays, systems, and how they run.
I am breaking this article up into two pieces – first because it’s long enough, and secondly I want some of the newer readers to be able to read about a power play and understand it a lot better before getting deeper into the Mammoth and what is going on there.
The follow up from here (in a few days) will get into specifics, which plays we run with which personnel, with what systems, etc.
Since there’s a lot here, I decided to share a few jump points. If you already know the basics of a power play, and already know what personnel are used and why, I’d suggest jumping into the zone entry section:
Mammoth Stats
Explaining a power play
Power play personnel
Power play zone entry
Power play formations
In the NHL, and hockey in general, there are two important things. The first is scoring goals against your opponent. The second? Preventing goals scored against you. It’s no surprise, then that the health of a team is dependent on what is known as the “goal differential”. This is the difference between goals scored and goals given up. A positive goal differential is good for your team, whereas a negative is the opposite.
With that said, how do the Mammoth fare?
Utah currently sits dead center of the league with 183 goals for. That puts the Mammoth in the 16th spot in the league. On the other side, the Mammoth are giving up just 157 goals, good for the 4th best rate in the league. 183 goals for and 157 goals against is a +26 goal differential. That is good for 7th best in the league.
So, Utah has a goal differential that should get them somewhat deep into the playoffs on paper. But, on paper and in practice are two different things. Playoff hockey is quite a different beast than regular season, though. In the playoffs, defenses get tighter and goals come less frequently. As a result, most playoff teams will see lower goals against, but also lower goals for. This means scoring is at a premium, and the power play is one of the most important ways to do this.
Some Basic Explanations
Before we get started, let me break down a few quick stats for you. While you probably know this, I want to make sure everyone reading this is on the same page. If you’d like to skip this quick overview, check the links at the top of the page.
5 on 5 hockey is when teams are at “full strength”. This is where the majority of games are played – anywhere from 60-100% of the game is played at this level. Teams are evenly matched, plus each has a goalie to defend.
When a player, or the team in general, commits a minor penalty, a 2 minute minor is assessed. The offending player (or, player selected by the coach for a bench minor) sits in the penalty box for 2 minutes, or until the team is scored against. The team who has a player in the penalty box is on the Penalty Kill, or PK for short. A team on a PK will have either 4 or 3 players on the ice, depending on some factors, but always one fewer than the other team.
The unpenalized team goes on the Power Play, or PP. A power play is hopefully less than 2 minutes for you; scoring on the power play ends this advantage. A team can have either a 1 or 2 man advantage – that is, one or two more players on the ice than the team on the penalty kill. There are rare instances where a team pulls a goaltender for an extra attacker, meaning a power play can be anywhere from the most common 5 vs. 4, or the least common 6 vs. 3.
Note: If a team on the penalty kill scores, they remain on the penalty kill.
Explaining a Power Play and How It Works Best
A power play is unique in hockey because it causes a fundamental shift in a team’s thinking. Generally, a power play unit forgoes defense in lieu of offensive strength. Most of the times, power play replace a defenseman with a forward, giving a team 4 forwards and 1 defenseman compared to the normal 3 forwards, 2 defensemen.
I knew a coach that told me once: “A power play should cause chaos, and a penalty kill should be designed to eliminate it”. This is a great way to look at how effective you are as a power play unit. Creating havoc means players out of position and shooting areas that are much more dangerous for the opposing goalie than normal. A static, or non-moving power play, allows the defenders to mark their assigned spots, gives the goalie lines of sight to pucks, and generally shuts down plays before they can even develop.
Creating havoc, and ultimately scoring, can be done in a few ways:
1) The first would be to cause a goaltender to be out of position for a save. This is generally done with puck movement and good passing. Since there is more space for a PP unit to work in, good passing and puck movement can force both a defenseman and a goalie out of position for a better shot.
Typically this shot is from a one-timer – an immediate shot from a pass. This immediate shot gives the least reaction time from a defense – and especially a goalie – to recover. This, typically, is also done from in close to the goal, usually from the area between the two face-off circles, and usually not much further out than the face-off dot in the middle.
One-timers can be risky, however. Since you can’t aim as well, a shooter can miss the net entirely. This can be extremely problematic because a hard shot that misses the net tends to exit the offensive zone at high speeds. This means the power play has to regroup, killing precious time to score.
2) Aside from beating a goaltender with puck movement and a one-timer, goaltenders can be beat from rebounds in close. To be successful here, the power play team needs to be able to control space around the goaltender’s crease – that blue area in front of the net. Additionally, this type of play requires shots to provide a rebound, which means shots difficult for a goaltender to control. The worst spot for a goaltender to make a save is the leg pads. While a goalie can kick a rebound in a specific direction, there is always a rebound from the pads. Meanwhile, shooting higher on a goalie means he may be able to catch the puck, which stops play and is detrimental to the power play.
Failing to get to rebounds, or failing to control the space in front of the net gives the penalty kill an advantage. Since they’re in closer to the goal to defend it, they are more likely to get to the puck, and clear the zone – forcing the power play to again regroup.
3) The third option is to crease screens and tip chances. Screens are when a player stands in line of sight of the goalie. This cuts down their vision of the puck and where it is going to go. There are two advantages here – the first is to give the goaltender the least amount of reaction time possible. Additionally, without knowing where and when a shot is coming, a goaltender may not even be in the best angle to stop the puck to begin with.
Tipping the puck coming to the net, meanwhile, changes the direction of the shot. This gives the goaltender next to no time to react to the new path of the shot. A well placed tip is nearly impossible for a goaltender to make a reaction save on, and will often times lead to a goal.
Failing to get a proper screen, or a lack of tips will give a goaltender a much easier shot to save. This can either lead to them holding on to the puck to stop play, or allow him to direct the puck to a defender to clear the zone. Tips are also notoriously hard to aim, so shots will often miss the net and can also result in turnovers and board battles for loose pucks, further killing time.
4) The final option, which is to free-wheel everything, and hope for the best. This, obviously, isn’t ideal – but it can and does work sometimes. Odd-man rushes against a penalty kill unit don’t usually happen, since the PK unit is focused on defense and won’t usually over-commit to an offensive push. However, sometimes a PK unit gets too aggressive, or has a terrible line change, so it is possible to see these rushes succeed once in a while.
The problem here is this really isn’t a method to rely on at all, and run-and-gun offense isn’t really consistent at all.
Power Play Personnel
While 5 on 5 strategies require a team to balance their offensive and defensive responsibilities, a power play provides a team with a uniquely offensive style of play. The fact that an offense should be able to control the puck in the offensive zone for extended time means that teams will often change their 3 forward and 2 defenseman lines to a 4 forward and just 1 defenseman line.
Without diving into the world of penalty killing, the 1 defenseman strategy is great for offense, though there is always a higher risk of a short-handed goal against. Since forwards are less defensively capable on average than a defenseman, any odd-man rushes against the team on the power play will generally be at much more of a disadvantage than normal.
The typical thought process that most teams use is to put their best 4 scorers on a top line, which will take anywhere between 1:20 – 1:30 of the 2 minute penalty, and a second line to play the remaining 30 – 40 seconds.
The Zone Entry
To make a power play work, first you need zone possession. This means your team needs to cleanly control the puck. While a power play face-off starts in the offensive zone, and pucks out of play and goalie stoppages will likewise give the PP a chance for an immediate offensive zone possession, this is not always the case. A PK will often clear the puck out of the zone following a missed shot, block, or turnover, and the PP unit with bad shot selection can often shoot the puck hard enough that the puck leaves the zone on its own. In either case, this situation forces the PP unit to regroup and try for a zone entry. The type of zone entry is where the first decisions in a power play occur.
Even though the PK is down a man, a zone entry is harder than it looks. This is because during 5 on 5 play, a defending team can push one or even two players to pressure the puck carrier. This forecheck can lead to turnovers, but also can leave holes in the defense which allows for space to operate. In a PK, usually the defending team sells out for defense, and can stack 3 or all 4 players at or by the blue line, making entries difficult. So, how do you break in?
There are several ways to enter the offensive zone:
1) Neutral Zone Drop Pass
The Neutral Zone Drop Pass (which probably has a proper name) occurs when a player – most likely the defenseman – carries the puck from behind their net to the neutral zone. From here, they drop the pass backwards towards their blue line, where a forward will skate into the puck at full speed.
This gives the attacking forward an advantage over the defense. Since the defense is stationary, the attacking forward’s speed will easily outstrip anything the defense can do. However, the forward will be trying to break into a zone with 4 defenders, making a clear path extremely difficult to breach.
2) The Swing Zone Entry
This is a more standard and traditional entry. Typically, a player will carry the puck between the face-off dots in the neutral zone (generally closer to center ice), and a second forward will attack the defensemen close to the boards at the edge of the ice. This forces a defenseman to commit to the pass, either opening a lane for the puck carrier to enter the zone himself, but more likely will open a passing lane to the wing.
The advantage here is that this zone entry is safer, allowing a team more chance to enter the zone because the defensive front is not as united. Soft spots will open up allowing a team to gain access to the zone.
The disadvantage here is that the defenseman on the wing will often pin the attacking forward along the boards. This limits their options on where to move with the puck, and passing lanes get tighter as space is more limited.
3) The Dump and Chase
A standard entry for even strength, a dump and chase is simply when the puck is shot deep into the offensive zone. Ideally, the puck is shot outside the zone where the goalie can touch the puck – the trapezoid behind the net – which forces the defense to try and outrace the offense to the puck.
The benefit of this play is there is very little risk for offside being called, and the puck will guaranteed to be deep in the opponents zone. Gaining control here is advantageous because the amount of open from the boards back to the blue line is much more open, giving additional options for passing plays or to try and get a quick one-timer on net, with traffic in front.
The negatives are simple though – giving up control of the puck can often lead to turnovers and clears. If your team isn’t physical enough to fight the other team on the boards for possession, the defense can kill time off the clock by holding the puck against the boards for some time, or can win and clear pucks outright, forcing another zone entry again.
The Formations
With the puck controlled in the offensive zone, the actual formations begin. Simply put, there are only so many configurations you can place 5 attacking forwards. The style of where the forwards play, and their roles, however, are different in each playstyle.
The 1-3-1
The 1-3-1 is currently the most popular format in the NHL today. The system is simple – one defenseman controls the blue line. Three forwards occupy the middle; two from the face-off circles on either side of the ice, with the third in the center.
Forgive the rudimentary illustrations; I stole the rink surface from For the Love of Hockey to share a diagram for you. The blue colors are our PP players, where black is the PK players:
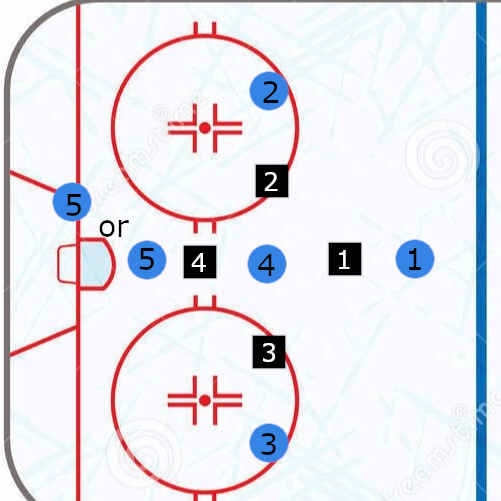
Player 1 has two passing options in player 2 or 3, or can shoot hoping for a deflection or tip.
Player 2/3 can choose to shoot a one-timer, or pass to players 1,4, or 5.
Player 4 can shoot, or pass to 2,3, or 5
Player 5 has passing options to either 2,3, or 4.
The 1-3-1 formation works best when players 2 and 3 are both great shooters and passers. If a shot isn’t available, a pass cross-ice to either the bumper (4) or the far wing will often get a goalie far out of position, giving a great shot option.
Bumper 4 works best with physicality and shot selection. With ideal positioning, this spot gives the shooter the entire net to shoot at, but also is the most difficult spot to pass to.
Option 5 is there to tip pucks and potentially get rebounds. Physicality is key here.
The defenseman, option 1, is ideally a great puck mover – both passing and skating with the puck.
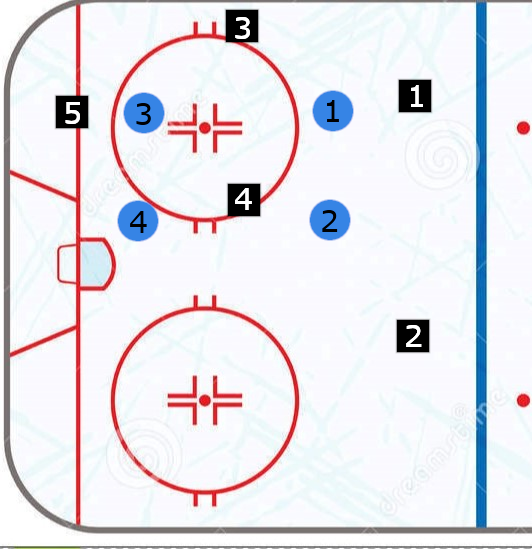
The Umbrella
The Umbrella offense used to be the mainstay in the NHL for decades. In the Umbrella, the defenseman is in the same position as in the 1-3-1, but the slot player (4) is at the side of the net as a counterpart to player 5.
The formation is designed to allow players 2 and 3 to still shoot one-timers. However, this layout gives players 4 and 5 deeper access to the goaltender, allowing for more screen and tip opportunities in front.
Players 4 and 5 are also in an ideal situation to collect rebounds for high-danger, close in shots or from tipping shots coming from the players back at the blue line.
Unlike the 1-3-1, the penalty killers cannot easily line up in a diamond formation, and must rely on a box formation instead. As it sounds, the players will line up more generally in a square, with 2 defensemen playing low towards the goal. Theoretically, this opens up passing between the three players higher at the blue line, so less chance for turnovers.
The Umbrella is ideal for to prevent short-handed chances against, and with three players back, shots that miss the net have a higher chance of getting collected before they leave the zone than a 1-3-1 layout, because players at the blue line have more time to react to the puck going the wrong way.
The Overload
The Overload offense has fallen out of favor for some time now, but when properly used can be very effective. The layout for this position is completely different than the previous two, and looks like this:
Players 1 and 2 support from the blue line.
Player 1 is an outlet for Player 3 if pressure does not allow a pass to Players 4 or 5.
Player 2 is a good cross-ice one-timer option. Player 2 can also slide down into the slot, mimicking a 1-3-1 for a one-timer.
Players 3 – 5 will cycle the puck along the boards, with priority given to each other when possible.
The formation is a little dated in the NHL due to the prevalence of the 1-3-1, however this was the go-to for years for teams that had better skill players. It requires players with good, quick decision making skills in positions 3, 4, and 5, as well as high-passing skill. Since play is effectively on only half of the ice, overall space to play in is cut down – but when shots open up, the quality of shots is generally high.
The Spread
The Spread, the last system, is almost universally used on 5 on 3 power plays, but far less-so on 5 on 4. It has 3 forwards play in close to the goal tender, forcing the penalty killers deep in their zone. This allows the 2 defensemen high the ability to shoot one-timers with a lot of space, and ideally traffic or tips in front of the net. However, since this is extremely rare to use on 5 on 4, we’ll ignore it for now.
NEXT UP:
Part two of A Mammoth Problem: The Power Play.
Stay Tuned!
– Adam “Your Favorite Hockey Guy in Utah”


Leave a comment